Friday, March 18, 2011

Intro to XLPE armored cables

Following is a short introductory brief on armored XLPE electric cables as a supplement to the original article, PVC PILC XLPE MICC cable installation .

Photo 1 – Armored XLPE cables on cable tray


In case some readers are confused why I give lengthy basics on the electrical engineering in this blog, please be reminded that this blog is intended for beginners.

Diagram 2 – Schematic diagram for a small compound lighting feeder pillar
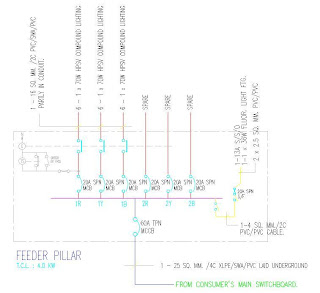


I always like to use schematic diagram of street lighting or compound lighting feeder pillar when I need to use a single line schematic to explain about cables.

That is because many of the other players (the architect, construction managers, quantity surveyors, landscape designers, etc) on a construction site can easily connect to a compound lighting feeder pillar.

The single line diagram is also simple enough for people without electrical training to understand with additional assistance.

Diagram 2 above show one such feeder pillar single line diagram.

Since this article is about cables, I will only explain about the cable parts of the schematic. I will explain on other parts in future post.

The cable

Here the XLPE cable is used as the incoming supply cable to the feeder pillar. One length of underground armored cable is used. Underground means the cable is installed inside the ground about 3 ft below the surface.

Armored cable cost much more because of the steel wire armor protecting the cable from physical damage. The letters SWA in the cable tag “XLPE/SWA/PVC” is an acronym for “steel wire armor”.

“XLPE” at the front means the insulation of the cable conductor. When we say a cable, the terminology is actually not precise enough.

In this case, inside the incoming supply cable there is actually 4 inner cores each with an electrical insulation. Therefore, each of the four insulated inner cores (the inner core is usually made of either copper or aluminium) is a complete electrical cable by itself.

The four of them are bunched together to make it easier to run and it can reduce the cost. We can actually use 4 independent cables instead of one cable with 4 inner insulated cores.

The XLPE label mentioned above indicates the type of insulation of each of the inner cores.

When these cores are bunched together in a bunch like these, an outer insulation is again extruded or layered over the whole bunch, making it look like a single cable. It is actually 4 cables that are bunch together.

The outer insulation is called outer sheath.

If this cable is to be installed underground, it is always better and always considered necessary to provide something strong over the cable in case an excavation work accidentally hits it.

That is why the steel wire armor wrapped around the cable spirally all along the cable length. The armor protects the cable physically.

Then in order to protect the armor against corrosion and other degradation, another layer of insulation is applied over the steel wire armor. Most of the time, it is of PVC (poly vinyl chloride) materials.

That is the label “PVC” on the right of the cable tag.

I did not finish the XLPE part, did I?

What is XLPE?

The XLPE is just like the PVC, but is more expensive and of better quality. That is why it is used only at the inner core of the cable. The PVC material can be used instead of the XLPE, and it will work just fine.

But with XLPE, the inner cores can usually carry higher current for the same inner core size.

What is “1 – 25 SQ. MM. / 4C”?

“4C” – I just explained above, the 4 inner cores. If there are 5 or 3 cores inside, then it would have been 5C or 3C accordingly.

“25 SQ. MM.” – I mentioned about the size of each inner core, the copper or aluminium material underneath the XLPE insulation. This is the size. It is always in the form of net or real cross-section area. This means if an inner core is constructed of several smaller cylindrical copper wires, then the total cross-section area of those individual wires is taken and used to indicate the size in square millimeters.

I am following the British or European Standards here.

“1 – “ … well this mean one length of the 4-core cable is used here. We can use 2 lengths which will give us 8 cores of same sizes. They are installation conditions that may force us to do that, which is a more advanced topic. In that case, it would have been written like this:

“ 2 – 25 SQ. MM. /4C XLPE/SWA/PVC”.

As I said this post is just a short introductory brief on armored XLPE cables.

Click here to go back to the previous post, PVC, PILC, XLPE and MICC cable installation.

Note: This anchor post, Free electric installation pictures , may contain a summary of the materials you are looking for. It can be faster than clicking through each post title at the Blog Archive. I started it long ago but never actually got around to finish it.

Copyright http://electricalinstallationblog.blogspot.com/ Intro to XLPE armored cables

Thursday, March 17, 2011

Weatherproof socket outlets

I have attached below a few photos of metal-clad electrical outlets that have been mentioned in the original article, Socket outlets and switch installations. A brief explanation is given below for beginners in electrical installation works.

Photo 1 – A weatherproof electrical outlet


In case some readers are confused about the lengthy basics of electrical engineering that are given in this blog, please be reminded that this blog is intended for beginners.

Beginners do not necessarily mean students and young people, but the “beginners” category also include people like managers, architects, quantity surveyors, contractors who have just jumped into the area of building works from other industries, construction managers, etc.

This blog is for them. In fact I never even intended it for youngsters and teenagers. Even some university students may find some of the post and articles here either too advanced or too heavy for them.

I mean no offense, but if you can handle them all then be my guest. If not, then just stick to the lighter ones.

This post is an “extra light” one. When I send a short post just to load in some photos to complement a “heavy post” such as electrical specifications, then it will be a “light” post suitable for everyone.

That’s because photos can be easily understood by almost anyone.

Now let us get back to the electrical socket, shall we?

When we install socket outlets or electrical switches, it is always better to install them indoors.

Water and electricity don’t mix. If we install the power outlet outside, it can be exposed to sun and rain.

The sun is not so bad, but it will quickly deteriorate the casing or the enclosure of the socket outlet unit.

The rain is another matter. Water seepage from outside into an electrical fitting can get in contact with the live parts inside the unit.

This present a serious shock risk to persons or even animals and pets who happen to come nearby.

Life however is not always simple. At times we really do need to install a few electrical outlets outside.

When you have to do this then the power sockets must be of a weatherproof type.

What is “weatherproof”?

Electric voltage inside an electrical fittings, equipment and appliance is very dangerous. It can easily kill people.

Everyone knows that. However, when it is installed at a location where there is a possibility of water seepage into the enclosure, then the equipment become extremely dangerous.

That is why when we say weatherproof, the design, manufacture and installation must comply with a certain criteria and quality standard.

The category of degree of waterproofing is graded by what is called IP rating.

Photo 2 – Weatherproof outlet IP rating


The 13A power socket here is rated as IP 66. The letter IP stands for Ingress Protection. I think that was how it came to be.

The first number after IP is the grade of protection against ingress is dust and solid objects into the enclosure.

The second number shows the class of protection against harmful ingress of water. The number “6” in this case means that the outdoor socket unit has been designed and manufactured to withstand against water jets to the unit from any angle.

This is important because outside of a building, there is always a possibility of the fittings and equipment being exposed to strong cleaning water in the form of a water jets. A strong rain storm also behaves like water jets to these electrical fittings.

Photo 3 – Another type


Photo 4 – The waterproof cover is open


Click here to go back to the Socket outlets and switch installations.

Copyright http://electricalinstallationblog.blogspot.com/ Weatherproof socket outlets

Wednesday, March 16, 2011

Metal-clad electrical sockets

The following are examples of metal-clad electrical outlets that have been mentioned in the original article, Socket outlets and switch installations.

Photo 1 – Metal-clad electrical outlets


This 13A switched socket outlet were installed inside an AHU room in an office buildings.

The room is an example of a plant room. Electrical substations, lift motor room, mechanical and electrical riser shafts are other examples.

The logic behind having a metal clad wall fitting inside such building spaces is obvious: toughness.

The metal casing of the unit provides better protection against damage by accidents and frequent usage.

The fact that they are installed exposed have nothing to do with toughness. Some people say a flushed installation of wall fittings gives a more pleasant look.

But here is a plant room. So who cares whether it is nice looking or not. That is why it is installed exposed.

Personally I like exposed things. Exposed and protected.

Photo 2 – A closer view


Photo 3 – Metal-clad light switch


I know this is not a 13A socket outlet. It is a light switch.

It has been installed in the same room as the metal clad power outlet.

So you can see that in plant rooms and non-public service areas, we go for toughness, practicality and ease of maintenance.


Click here to go back to the Socket outlets and switch installations.

Note: This anchor post, Free electric installation pictures , may contain a summary of the materials you are looking for. It can be faster than clicking through each post title at the Blog Archive. I started it long ago but never actually got around to finish it.


Copyright http://electricalinstallationblog.blogspot.com/ Metal-clad electrical sockets

Tuesday, March 15, 2011

Cable duct crossing roadside drain

Today I have uploaded a few photographs of underground cable ducts crossing a roadside drain at a project site a couple of months ago.

Photo 1 – Underground electrical ducts crossing a roadside drain


A good design of external electrical works would have considered the situations where all the different services would cross each other.

Even when they do not cross each other, the space where all the services need to be installed may become smaller or narrower.

Therefore a good design engineer need to foresee these potential problems that may be too difficult or too expensive to be solved by the trade contractors, engineers and managers during the construction stage.

In some construction environments, all designs from the respective design consultants and engineers would be passed through a coordination stage. There the detailed design drawings are superimposed over each other.

The mechanical and electrical services over each other and scrutinized for potential installation problems.

The mechanical and electrical construction drawings against the latest architectural drawings to spot any potential construction problems.

Outside of buildings, all external mechanical and electrical services drawings need to superimposed onto the civil infrastructure construction drawings to spot any potential clash between each one of them.

When potential construction or installation problems are spotted, adjustment can then be made. Part of the system may need to be re-designed. Some underground services may need to be re-routed.

We call this design coordination.

If this design coordination is not done enough, then construction people may have to make some adjustment at site as best as they can.

Sometimes problems can be solved easily.

At other times, the adjustment or modification that is needed is so expensive or time consuming that everybody including the owner has to accept some improvised solution that may be questionable from the point of view of quality, aesthetic aspect, or even integrity of the work.

In a situation when a second grade improvised solution is adopted by the one in power over the construction contract, the best a work superintendent can do is just to make sure the safety aspects are not compromised and the installation is “fit for porpose”..

I am saying this from the standpoint of an electrical works inspector.

Enough theories. Now let’s look at the pictures that I have uploaded.

By attaching these photographs together with this article, I am not saying that this is a design error or it is a bad work by the any contractor or the designers.

A construction problem can be caused by reasons as simple as a design error by the design consultant or the trade subcontractor under-pricing a certain part of work.

It can however be caused by a bad judgment of someone or some party involved in the project. That the decision or judgment was wrong might have not been noticeable during the initial stage of the contract.


Photo 2 – Closer view of the class “C” G.I. pipes


This photograph shows a closer view of the electrical ducting crossing the concrete drain.
When electrical underground ducts cross under a road, it is a usual practice to use class “C” GI pipes for the stretch crossing the road.

Similarly when the ducts need to be exposed such as when crossing the concrete drain here, the exposed stretch needs to be using GI pipes.

Because of that, two different type of duct materials need to be jointed. The following photograph show an example of the joints.

Photo 3 – uPVC ducts coupled to G.I. pipes


Photo 4 – uPVC ducts to uPVC ducts coupler


Photo 4 shows the couplers used to extend the length of the uPVC ducts. I guess there’s not much difference between the two except the color.

Photo 5 – Opening made to the drain to allow for the GI ducts installation


Photo 6 – A clearer sectional view of the drain


See you again...

Note: This anchor post, Free electric installation pictures , may contain a summary of the materials you are looking for. It can be faster than clicking through each post title at the Blog Archive. I started it long ago but never actually got around to finish it.

Copyright http://electricalinstallationblog.blogspot.com/ Cable duct crossing roadside drain

Monday, March 14, 2011

Blog Re-construction

What do you think of the electrical installation captured in the photograph below?

Photo 1 – Creative electrical installation? Funny? Dangerous?


Readers who have followed this blog many moons ago might have noticed that I have actually stopped sending any post since in January 2010.

That was more than a year ago.

I started this blog as part of an experiment on internet traffic… search engine traffic to be precise.

This was not the first blog that I did. I have had quite a number of blog before this one and they all looked worse than this. I was actually very new to this blogging stuff.

My intention was to draw traffic, not to get readership.

Then during the January of 2011, I again found out that this blog title was not strong enough to grow Google traffic quickly. At least I did not know how to do it at that time.

Rather than deleting the blog as I have done to a number of other ones, I decided to just leave it here. Just abandon it.

I though it might be interesting to see what would happen if I just leave it here receiving traffic.

Indeed I have learned and observed some interesting human behaviours…

Today however, I have just commissioned one more blog and I expect it to keep drawing in search engine traffic by itself from now on, needing only one or two post every 2 weeks.

The thought of reviving and reconstructing this blog crossed my mind again. Partly because I have spent some significant sweating hours on it and also because I have carried out a lot of internet traffic experiments using this blog.

So it has some kind of a sentimental value to me.

For that reason, today I will start posting here again. To readers who have kept frequenting this blog while I have been away this past 13 months, I value your visits and they have kept my heart warm and happy about starting this one.

To those readers who hate this blog so much because I left a post incomplete in a hurry in January 2010, I acknowledge my error and I acknowledge your hatred for that post.

Those who are wondering which post it was can see it here, Cable Ladder Installation.

With that I wish to close this re-opening statement.

See you again in the next post.

Note: This anchor post, Electrical Installations, may contain a summary of the materials you are looking for. It can be faster than clicking through each post title at the Blog Archive. I started it long ago but never actually got around to finish it.

Copyright http://electricalinstallationblog.blogspot.com/ Blog Re-construction